QNX Technical Articles
QNX® Momentics® Development Suite 6.3.0 Service Pack 3 Professional and Standard Editions Installation Note - Windows Hosts
Date of this edition: April 16, 2007
Target OS: QNX® Neutrino® 6.3.0 SP3
Host OS: Microsoft Windows Vista, XP SP2, 2000 SP4, or NT4 SP6a
 |
|
 |
|
Contents
- System requirements
- SP3 update paths
- Installing QNX Momentics
- Activating QNX Momentics
- Installing the Rational Rose Adaptation Layer
- Important notes
- Commercializing your evaluation software
- Uninstalling QNX Momentics
- Getting started with the docs
- Technical support
System requirements
Host OS:
- Windows XP SP2
- Windows 2000 SP4
- Windows NT4 SP6a
| Minimum | Recommended | |
|---|---|---|
| Processor | Pentium III, 700 MHz | Pentium 4, 2 GHz or more |
| RAM | 256 MB | 512 MB |
| Disk space | 2.1 GB | 2.1 GB |
| Monitor | 1024*768 | 1280*1024 |
In order to install SP3, you need 1500 MB of disk space, including the space required for backups and temporary space used in installing the files. About half of this disk space must be where your temporary directory resides.
The System Profiler in the IDE requires a minimum color depth of 16 bits.
|
Windows NT doesn't include usp10.dll, the DLL for the Uniscribe Unicode script processor. You can download the Windows 98 version of usp10.dll from support.microsoft.com/kb/q249973. |
SP3 update paths
There are several ways that you incorporate QNX Momentics 6.3.0 Service Pack 3 in your system, depending on what you've already installed:
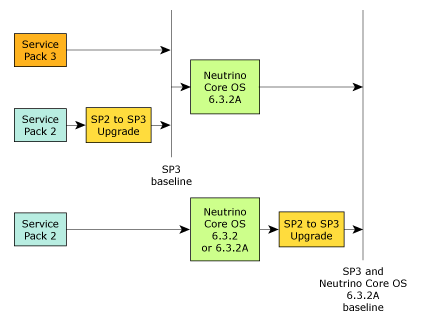
Here's a summary:
- To do a fresh installation, use QNX Momentics 6.3.0 Service Pack 3.
- If you've already installed 6.3.0 SP2, install the 6.3.0 SP2 to SP3 Upgrade.
- You can install the QNX Neutrino Core OS 6.3.2A on a system that has SP3, or SP2 plus the 6.3.0 SP2 to SP3 Upgrade.
- If you've installed the QNX Neutrino Core OS 6.3.2 or
the QNX Neutrino Core OS 6.3.2A on a system that has
6.3.0 SP2, and you want to upgrade to SP3, install the
6.3.0 SP2 to SP3 Upgrade.
Installing the 6.3.0 SP2 to SP3 Upgrade on a system with the QNX Neutrino Core OS 6.3.2 updates the core OS to 6.3.2A.
Installing QNX Momentics
|
If you install Neutrino in a partition on a Windows machine and later use Windows software to create another partition, you'll lose your Neutrino partition. |
|
If you've uninstalled QNX Momentics 6.3.0, the installer will refuse to
install SP3.
(Ref# 39610, 39613)
Workaround: Do the following:
|
To install this software:
- Boot into Windows and log in as the system administrator.
- Insert the QNX Momentics 6.3.0 Service Pack 3 Installation CD. The installation should start automatically; if it doesn't, double-click qnxSetupWin32.exe in the root directory of the CD.
- Follow the instructions on your screen.
If you install 6.3.0 SP3 on a machine that already has 6.2.1, select "Yes" when prompted about upgrading the environment variables. Otherwise, you won't be able to install future releases; see "Important notes," below.
- Log out and back in again. (Ref# 39631)
|
Java's AWT and Swing aren't supported in 16 color mode; they require a
minimum of 256 colors.
If you get a message, "Unable to run in graphical mode,"
run the installer in console mode, by typing this in a DOS prompt window:
drive:\qnxSetupWin32.exe -console where drive is the drive letter for your CD drive. |
Congratulations -- you've completed the installation! Your desktop should now include an icon for starting the QNX Momentics IDE.
Activating QNX Momentics
The QNX Momentics 6.3 development suite and certain related products require activation. If you don't activate the product within the specified timeframe, the product will cease to function until you activate it. No personal data is transferred during the activation process.
If your development host is connected to the Internet, you can activate QNX Momentics automatically; if your machine isn't connected to the Internet, you must activate your software manually from a machine that is, by doing the following:
- In the QNX Momentics Activation dialog, click Activate Manually.
The Manual Activation dialog appears with an activate-prompt key. This dialog has a button that you can use to save the activate-prompt key in a file, drive\Program Files\QNX Software Systems\license\activate_prompt_key.txt, where drive is the name of the drive where you installed QNX Momentics. This can eliminate the need to retype the key, which can be error-prone.
- Transfer the activate-prompt key to the machine that's connected to the Internet.
- Go to our website, www.qnx.com, log into your myQNX account, and choose Activate Products (6.3.x).
- Enter the activate-prompt key into the form that appears, and then click Generate Response Key. This will return an activate-response key.
- Copy the activate-response key and paste it in a file.
- Transfer the file into drive\Program Files\QNX Software Systems\license\activate_response_key.txt on your QNX Momentics development host.
- If you closed the QNX Momentics Activation dialog, open it again
by selecting
from the Start menu, or by entering the following at the command prompt:
[drive]\Program Files\QNX Software Systems\bin\qnxactivate -a
- Choose Activate Manually, and use the Load Response from File button to load the activate-response key, and then click Activate.
If you choose not to activate at the time of installation, you can activate later by selecting from the Start menu, or by entering the following at the command prompt:
[drive]\Program Files\QNX Software Systems\bin\qnxactivate -a
where drive is the name of the drive where you installed QNX Momentics.
Installing the Rational Rose Adaptation Layer
|
You must install the Rational Quality Architect - RealTime Edition 2003 Build 6.5 before installing the Rational Rose Adaptation Layer. You must have installed QNX Momentics 6.3 before you use the Adaptation Layer. |
To install the Rational Rose Adaptation Layer, go to the Rose directory on the QNX Momentics installation CD, and run qnxSetupRRAL.exe. You'll need your PE license key.
The Adaptation Layer is installed as a subdirectory of where you installed Rational Rose (e.g. C:\Program Files\Rational\Rose RealTime\C++\TargetRTS).
Important notes
- We now provide two shells:
- Bash shell (bash.exe)
- Korn shell (ksh.exe)
You'll find these executables under ${QNX_HOST}/usr/bin (e.g. C:\QNX630\host\win32\x86\usr\bin). You may want to create desktop shortcuts for these or other executables you'll use often.
- The QNX Momentics IDE shortcut has a working directory set to C:\QNX630 (or wherever you installed the software). By default, users who aren't system administrators don't have write access for this directory. You might want to change the shortcut so that it starts the IDE in a directory that non-administrator users can write in.
- If you install 6.3.0 on a machine that already has 6.2.1,
and you select "No" when
prompted about upgrading the environment variables, you won't be able
to install future releases.
(Ref# 22740)
Workaround: Do the following:
- Open %PROGRAMFILES%\QNX Software Systems\qconfig\qnx_momentics_6.3.0.xml in a text editor.
- Edit the file so that <host> and <target> tags use the proper base directory. For example, if your <base> tag is <base>C:/QNX630</base>, then your <host> tag should be <host>C:/QNX630/host/win32/x86</host>, and your <target> tag should be <target>C:/QNX630/target/qnx6</target>.
- From the Start menu, choose All programs or Programs, then choose .
- Switch your configuration either from 6.2.1 to 6.3.0, or from 6.3.0 to 6.2.1. Click OK.
- Repeat steps 3 and 4 to make sure that the environment is set correctly.
- Repeat steps 3 and 4 to set the configuration to be 6.3.0 (if it wasn't already).
- If you find that the above steps don't make a difference, then log out and in again.
- On Windows, the QNX-provided echo.exe interprets the Windows \ separator as an escape character. As a result, environment variable settings won't work if you use \ as a path separator; use / instead. (Ref# 19924)
- If your PATH contains quotation marks, ln-w doesn't work properly. (Ref# 20046)
- In Windows, make sure your HOME environment variable is set if you're on a network. If you don't set HOME, then gdb may become unresponsive because it will waste time searching over the network for its initialization files. (Ref# 20566)
- Our recursive makefiles use the value of the NAME
environment variable (if set) to name the resulting binary.
We realized (too late) that this was too generic a variable to use for
this purpose; if you have a NAME environment variable set
on your system for some other purpose (e.g. your name or email address),
its value will be used as the name of your binaries.
We apologize for this mix-up.
(Ref# 29843)
Workaround: Unset the NAME environment variable before you build any executables.
- When you install QNX Momentics, the installer sets the QNX_HOST and QNX_TARGET environment variables. If you want to install any additional products from our website, and you want to run the installer from the website instead of saving it on your machine, don't use a browser or shell that was open before you installed QNX Momentics. An old browser or shell won't have those environment variables set, so the installer will think that you haven't installed QNX Momentics.
Commercializing your evaluation software
If you installed an evaluation copy of QNX Momentics 6.3.0, and you've now received a commercial QNX License Certificate, do the following to add your commercial license:
- Choose
from the Start menu, or enter the following at the command prompt:
[drive]\Program Files\QNX Software Systems\bin\qnxactivate -l
where drive is the name of the drive where you installed QNX Momentics.
- In the QNX Momentics License Key Entry dialog, fill in the field with the license-key information that's on your commercial QNX License Certificate.
- When you've finished entering the information, click Add to save the license-key information and configure your QNX Momentics tools to use this file.
Uninstalling QNX Momentics
|
You should uninstall QNX products in the reverse order in which you
installed them.
To determine this order, open a bash shell and use a command
like this:
ls -lt `find base_directory -name "*uninstall*.exe"` where base_directory is where you installed QNX Momentics. |
To uninstall QNX Momentics, do the following:
- Log in as the system administrator.
- Do one of the following:
- Choose
from the Start menu.
Or:
- Choose Add or Remove Programs from the Control Panel.
Or:
- Go to the directory where you installed QNX Momentics and run _uninstall/qnx630/uninstaller.exe.
- Choose
from the Start menu.
- Restart your system.
|
In some cases, if you uninstall QNX Momentics, the Add or Remove Programs window still lists some BSPs, DDKs, and TDKs. Press F5 while in Add or Remove Programs to refresh the list and show what's actually installed. |
When you uninstall QNX Momentics 6.3.0 SP3, InstallShield leaves the empty $QNX_HOST/usr/bin directory behind. (Ref# 39720)
Getting started with the docs
For information about QNX Momentics 6.3.0, see:
- the release notes in $QNX_TARGET/etc/readme/rel_6.3.0_SP3.html
- the online documentation at ${QNX_TARGET}/usr/help/product/momentics/bookset.html
You can install and work with multiple versions of QNX Neutrino. Whether you're using the command line or the IDE, you can choose which version of the OS to build programs for. For more information, see the IDE User's Guide or the QNX Neutrino Programmer's Guide.
Technical support
If you have any questions, comments, or problems with a QNX product, please contact Technical Support. For more information, see the How to Get Help chapter of the Welcome to QNX Momentics guide or visit our website, www.qnx.com.